PSA Citroen C5 Stereo Upgrade - from RD3 to RD45 (applied to Peugeot 307SW, Citroen XSara / C5 / C8, Berlingo)
Updates Feb 21, 2019:
1. A lot of audiences can't find V2C online anymore. HERE is the upgrade package DEAL from my eBay store.
2. My Contact information: FB.com/jouston
Recently I found Taobao is extremely useful while buying cost-effective PSA parts. One part caught my eyes immediately: RD45 with V2C converter board.
My 2001 Citroen C5 2.0i 16v is a nice machine can carry the whole family with a dog to go camping without roof rack/bars, and curving in Taiwan Route 11 like 83km/hr right in the corner. My camping fellows are quite impressive about how this car can do.
However, while I purchase this car from the dealer the condition isn't my perfectly accepted. Especially the speakers were broken in the rear doors.
Since RD3 and my C5 mk1 are both talks on VAN bus while RD45 is a CAN bus stereo unit. We will need a V2C converter(VAN to CAN) handcrafted in China. Notice there are a lot of clones/pirated V2C converters there and they have really poor quality, our group have witness Dashboard regularly crash, BSI bricked and C display(nickname of the multifunction display) malfunctioning. So please only buy V2C converter from the seller I suggested, he is one of the developer of V2C and the only one selling proper V2C converter board. (NOTE: After 4 years, good news and bad news. Bad news is developers cease the V2C board production for 2 years now. No stock anymore. Good news is the clone unit have largely improved quality.)
The difference from developer V2C to pirated clone:
Equipment required:
If you have any questions. Contact me on FB.com/jouston
Step 1: remove RD3, you remove those two covers from the button with a small flathead screwdriver. Then use T10 star screwdriver to remove those two screws on RD3. Pull it out.


1. A lot of audiences can't find V2C online anymore. HERE is the upgrade package DEAL from my eBay store.
2. My Contact information: FB.com/jouston
Recently I found Taobao is extremely useful while buying cost-effective PSA parts. One part caught my eyes immediately: RD45 with V2C converter board.
My 2001 Citroen C5 2.0i 16v is a nice machine can carry the whole family with a dog to go camping without roof rack/bars, and curving in Taiwan Route 11 like 83km/hr right in the corner. My camping fellows are quite impressive about how this car can do.
However, while I purchase this car from the dealer the condition isn't my perfectly accepted. Especially the speakers were broken in the rear doors.
Since RD3 and my C5 mk1 are both talks on VAN bus while RD45 is a CAN bus stereo unit. We will need a V2C converter(VAN to CAN) handcrafted in China. Notice there are a lot of clones/pirated V2C converters there and they have really poor quality, our group have witness Dashboard regularly crash, BSI bricked and C display(nickname of the multifunction display) malfunctioning. So please only buy V2C converter from the seller I suggested, he is one of the developer of V2C and the only one selling proper V2C converter board. (NOTE: After 4 years, good news and bad news. Bad news is developers cease the V2C board production for 2 years now. No stock anymore. Good news is the clone unit have largely improved quality.)
The difference from developer V2C to pirated clone:
- RD45 and car VIN semi-auto matching instead of using PP2000 or Lexia 3 to configure.
- Firmware upgradable. Developer V2C package come alone with USB upgrade cable and V2C serial number. You can check firmware version number right in the C display.
- Much better parts used in developer V2C while pirated one have half BOM cost.
Equipment required:
- (Important: only buy V2C from this seller!) RD45 + V2C package: (NOTE: Unfortunately the original seller did not sell this V2C package anymore. I have opened eBay store to serve you: HERE is the DEAL.
- T10 star screwdriver
- Small flathead screwdriver
- Ruler or a bigger flathead screwdriver
- (optional)12V test pencil (go your local electronic shop or ebay)
- (optional) Multifunction display external box. HERE is the DEAL.
- (optional) PSA USB+Aux in car cigarette lighter slot. HERE is the DEAL.
- (optional) Citroen C5 mk1 1 DIN stereo mod frame. (Go your local dealer or ebay) HERE is the DEAL.
If you have any questions. Contact me on FB.com/jouston
Step 1: remove RD3, you remove those two covers from the button with a small flathead screwdriver. Then use T10 star screwdriver to remove those two screws on RD3. Pull it out.
Step 2. Use long ruler or bigger flathead screwdriver to remove the original multifunction display. We call it "A" display different from the newer "C" display.
Step 3. Remove the harness from RD3 and place your RD3 to somewhere else. We don't need it anymore.
Step 4. Plug in the White plug(from RD3) to the converter harness(for RD45).
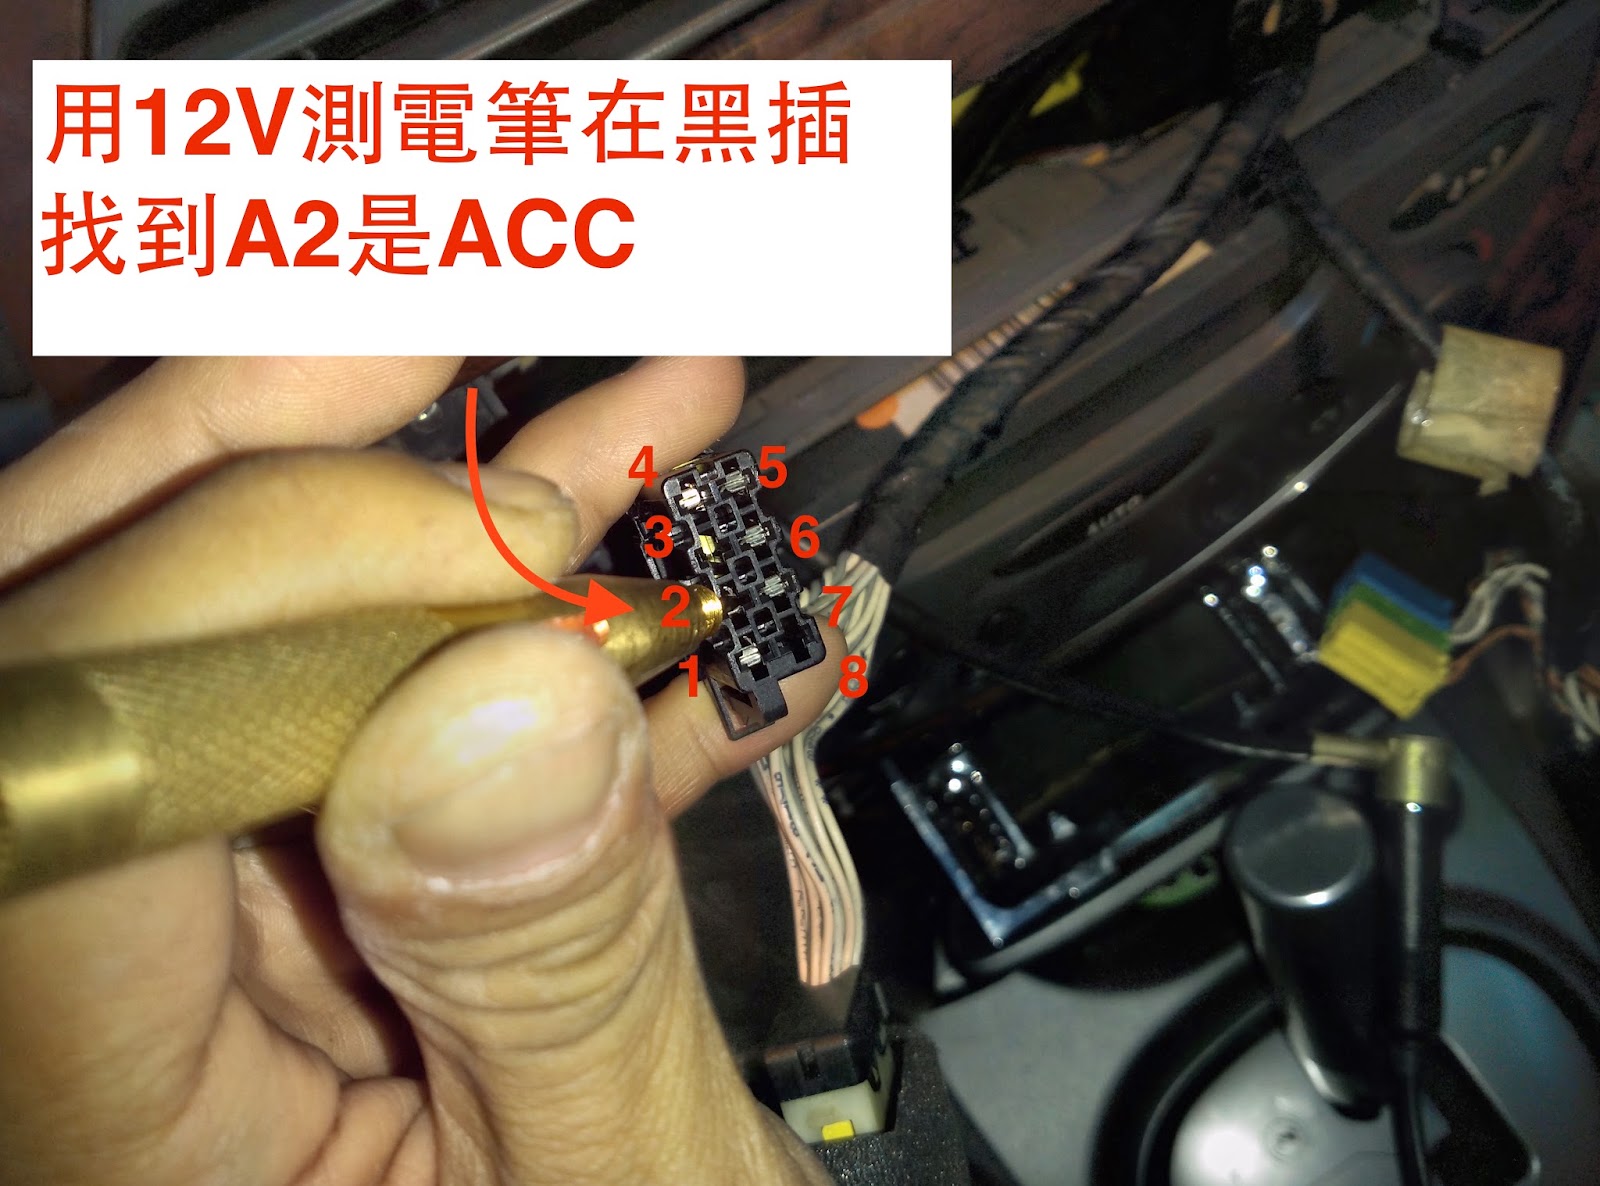
Step 5. Find ACC with 12V test pencil. On my Citroen C5 mk1 2.0i 16v it's on A2. Then you plug in the ACC cable into the Black Female Plug(for RD45) then plug in the Black Male Plug(From RD3)
What is ACC? When your key turns to ON position the ACC will give you 12V + power but shut off when you turns the key to OFF position.
Note. Some of the PSA cars like mine will have a delay for ACC, it shuts off after 3 minutes.
(dual display installation) Step 6. Remove the harness plug from A display. After disassembly the plug you will find plug like picture below. (single display installation see Below)
- Plug in the VAN + (seller will mark A4/A5 with a paper tape on the cable) into the plug. (Citroen C5 mk1 is A5)
- Plug in the VAN - (seller will mark A17/A18 with a paper tape on the cable) into the plug. (Citroen C5 mk1 is A18)
- Assemply the plug and plug it back to A display.
- Install the A display back to where it should be. (recommended: dual display installation)
Step 7. Plug in the converter harness to C display. Now you almost have a full functioning RD45 upgrade.
Step 8. Plug in the Aerial Atana to aerial converter and then plug the converter to RD45.
Step 9. Plug in the converter harness to RD45. Be careful there is a leveler on the plug, make sure you place it at the 90 degree position and then plug in the plug. Then press it to make the plug firmly attached on the RD45
Step 10. Now you are ready to test. Insert the key and turn to ACC/ON position. Turn on your radio to enjoy the music.
Step 11. Having strange Bi...Bi...Bi... sound? Yes it's the RD45 anti-theft function activated. Now it's time to enjoy the developer V2C exclusive function.
- Make sure the key is ON/ACC position and RD45 is turned on
- Turn radio the AM 1620
- (Just do key press on RD45, don't look at C display) Press MENU
- Press OK and keep it hold
- Press ⬅︎ (LEFT) and keep it hold for 3 seconds
- Release OK and ⬅︎ (LEFT) together
- (Look at C display) Press ESC 3 times until it's back to home screen
- (Look at C display) It should be flashing "VIN clean". If not, turn key to OFF position and repeat step 1 - 7
- Turn key to OFF position and wait for 3 or more minutes until the RD45 power was cut by car. (ACC off)
Now the stereo was perfectly upgraded! You can play music from bluetooth, AUX, USB stick or CD.
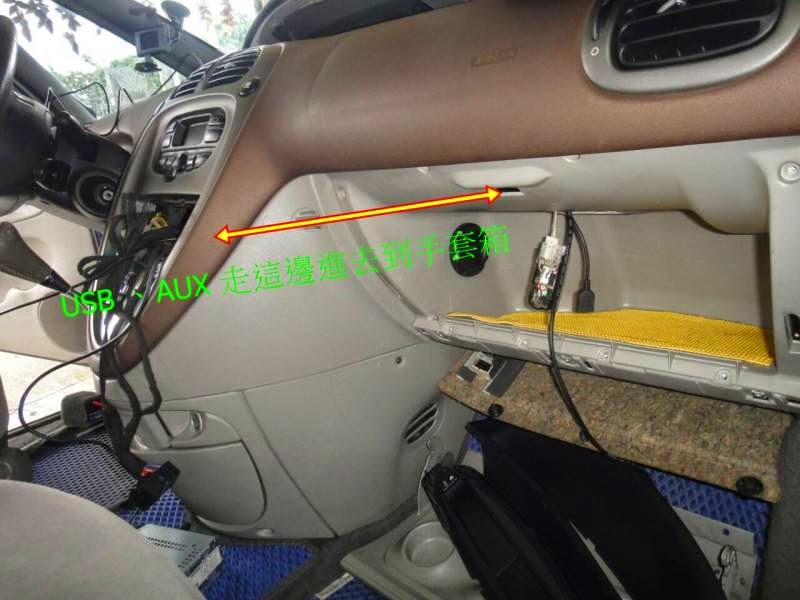
(optional) Step 12. Remove the CD changer since you won't be able to use it any more.
Replace the USB cable with the very cool USB+Aux cigarette lighter plug.
Install the C display with the external box.
Install the 1 DIN frame to make the stereo look better. (it's not shown in this picture)
Notes:
About different RD45 stereo units: 408, 3008, C5 mk2
The panel isn't same, and RD45 from C5 mk2 have second antenna plug.
About different C display: Yellow, two Orange type
C display in yellow colour is cost down version. Don't touch it. The two type of C displays were made from different OEM. Premium SKU have better coverage on CJK(Chinese/Japanese/Korean) characters.
About dual display installation and single display installation.
Some of the A display feature haven't been implemented on V2C converter board:
- Fuel economy statics clear
- Hydractive 3 level display
- Anti-polution Fault warning
But C display have more features than A display:
- Handbrake ON warning
Due to the fact both A and C display have features you will like, keep both display is the better way. You can only kept C display too if you are happy with limited display function. Here is how:
(Single Display Installation) Step 6. Remove the harness plug from A display. After disassembly the plug you will find plug like picture below.
- Remove the VAN+ plug(seller will mark A4/A5 with a paper tape on the cable) and merge it into the plug together with the original plug. (Citroen C5 mk1 is A4 together)
- Remove the VAN- plug(seller will mark A17/A18 with a paper tape on the cable) and merge it into the plug together with the original plug. (Citroen C5 mk1 is A18)
- Install the C display back to A display. You will going to need a decoration panel to cover up C display. (come alone with V2C package)
Citroen Xsara Picasso Installation Pics
Peugeot 206 Installation Pics
Peugeot 307SW Installation Pics


留言
張貼留言